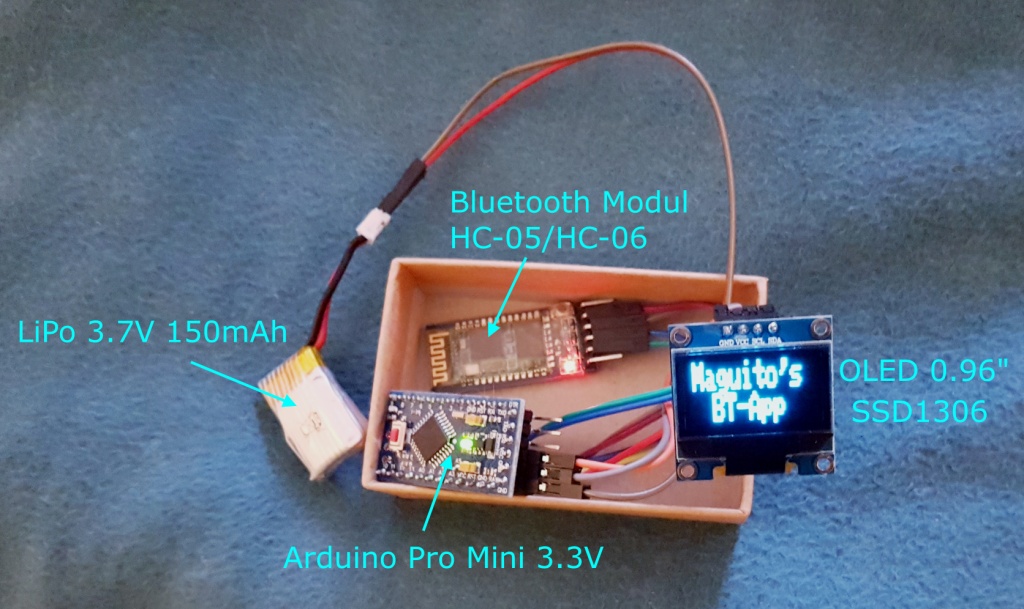
The main idea of this project is to send some information from your cell phone (through an App) to your Arduino via Bluetooth and then to display this information on an OLED Display. I found this project originally published by circuitdigest.com on how to build a basic Smart Watch Interface easy to follow and well explained.
Video:
Here is a video showing how it works:
You can get more information and the code for the Arduino following the link to this project:
#include<SoftwareSerial.h>
SoftwareSerial Serial1(0, 1);

#include <SPI.h>
#include <Wire.h>
#include <Adafruit_GFX.h>
#include <Adafruit_SSD1306.h>

#define OLED_RESET 4
Adafruit_SSD1306 display(OLED_RESET);

#define NUMFLAKES 10
#define XPOS 0
#define YPOS 1
#define DELTAY 2

#define LOGO16_GLCD_HEIGHT 16
#define LOGO16_GLCD_WIDTH  16
String str = "";
byte h = 0;
byte m = 0;
byte S = 0;
String dmy, time, network, battery, inNumber, s;
byte centerX = 24;
byte centerY = 18;
byte Radius = 12;

double RAD = 3.141592 / 180;
double LR = 89.99;

void showTimeAnalog(int center_x, int center_y, double pl1, double pl2, double pl3)
{
  double x1, x2, y1, y2;
  x1 = center_x + (Radius * pl1) * cos((6 * pl3 + LR) * RAD);
  y1 = center_y + (Radius * pl1) * sin((6 * pl3 + LR) * RAD);
  x2 = center_x + (Radius * pl2) * cos((6 * pl3 - LR) * RAD);
  y2 = center_y + (Radius * pl2) * sin((6 * pl3 - LR) * RAD);
  display.drawLine((int)x1, (int)y1, (int)x2, (int)y2, WHITE);
}

void digitalClock()
{
  display.setTextSize(1);
  display.setTextColor(WHITE);
  display.setCursor(60, 5);
  display.println(dmy);//dmy
  display.setTextSize(2);
  display.setCursor(60, 15);
  display.println(time);//time
  display.display();
  delay(2000);
}

void Battery()
{
  display.clearDisplay();
  display.setTextSize(1);
  display.setTextColor(WHITE);
  display.setCursor(5, 0);
  display.print("Bat:");
  display.print(battery);
  display.print("%");
  display.drawRect(14, 10, 80, 20, WHITE);
  display.drawRect(94, 13, 10, 14, WHITE);
  display.fillRect(14, 10, (int)(8 * (battery.toInt()) / 10), 20, WHITE);
  display.display();
  delay(2000);
}

void Network()
{
  display.clearDisplay();
  display.drawLine(5, 7, 25, 7, WHITE);
  display.drawLine(5, 7, 14, 15, WHITE);
  display.drawLine(25, 7, 17, 15, WHITE);
  display.fillRect(14, 7, 4, 20, WHITE);
  int net = 100 / 20; //network.toInt() / 20;
  int x1 = 24, y1 = 25, x2 = 4, y2 = 2;
  for (int i = 1; i <= net; i++)
  {
    display.fillRect(x1, y1, x2, y2, WHITE);
    x1 += 10;
    y1 -= 3;
    y2 += 5;
    y2 -= 2;
  }
  display.setTextSize(2);
  display.setTextColor(WHITE);
  display.setCursor(80, 0);
  display.print(network);//network
  display.setTextSize(1);
  display.setCursor(117, 7);
  display.println("%");
  display.display();
  delay(2000);
}

void setup()
{
  Serial.begin(9600);
  display.begin(SSD1306_SWITCHCAPVCC, 0x3C);  // initialize with the I2C addr 0x3D (for the 128x64)
  display.clearDisplay();
  Serial1.begin(9600);
  Serial1.println("System Ready");
  display.setCursor(5,0);
  display.setTextSize(2);
  display.setTextColor(WHITE);
  display.print("Maguito's   BT-App");
  display.display();
  delay(1000);
}

void loop(){
  Serial.println("1234");
  delay(1000);
  while (Serial1.available() > 0){
    char ch = Serial1.read();
    str += ch;
    if (ch == '$'){
      dmy = str.substring(str.indexOf("#") + 1, str.indexOf(" "));
      time = str.substring(str.indexOf(" ") + 1, str.indexOf(",") - 3);
      network = str.substring(str.indexOf(",") + 1, str.indexOf(",,"));
      battery = str.substring(str.indexOf(",,") + 2, str.indexOf(",,,"));
      inNumber = str.substring(str.indexOf(",,,") + 3, str.indexOf("$"));
      s = time.substring(time.indexOf(" ") + 1, time.indexOf(" ") + 3);
      h = s.toInt();
      s = time.substring(time.indexOf(" ") + 4, time.indexOf(" ") + 6);
      m = s.toInt();
      s = time.substring(time.indexOf(" ") + 7, time.indexOf(" ") + 9);
      S = s.toInt();
      str = "";}
  }
  display.clearDisplay();
  display.drawCircle(centerX, centerY, Radius, WHITE);
  showTimeAnalog(centerX, centerY, 0.1, 0.5, h * 5 + (int)(m * 5 / 60));
  showTimeAnalog(centerX, centerY, 0.1, 0.78, m);
  // showTimePin(centerX, centerY, 0.1, 0.9, S);
  digitalClock();
  Battery();
  Network();
}Materials:
The materials I used are the same as described on the original project, except for the OLED Display. You can use any other Arduino board or/and display type… If you are using a different Arduino Board or display type, don’t forget to change the code accordingly 😉
The App linked to the project didn’t work with my cellphone. I was lucky to share this project with Jorge Zingg, a very smart friend who created an App that works for my cell phone (using Android Oreo). The link to this App can be downloaded from his GitHub account here:
https://github.com/paicolman/Maguitos-Bluetooth-App
Connections:
The pin connections are as follows:
| Arduino Pro Mini 3.3V | OLED SSD1306 | Bluetooth HC-05/-06 |
| SDA (A4) | SDA | – |
| SCL (A5) | SCL | – |
| 10 | – | TXD |
| 11 | – | RXD |
Here is a circuit diagram made with Fritzing:

Android App – by Jorge Zingg
I am a beginner-level android developer, implementing apps with the main goal of having fun programming… Here are some insights on the app I built for Magdalena and her MStronik blog.
Android tutorials
The android app is implemented in Kotlin, and is relatively simple. If you want to adapt it, please do so freely, but be aware, you may need some basic knowledge of android development with android studio. There are many websites offering great tutorials on Android studio, I prefer these two guys:
Mitch offers a lot of free tutorials on YouTube, as well as paid courses on Android programming. He explains things very well in his videos and does projects which are very easy to follow. I have not yet bough one of his courses, as I think is better to play and have a basic understanding of things before following a complete course, but I plan to follow some of his more in-depth courses as soon as I get more proficient in Android.
https://www.raywenderlich.com/android
Ray Wenderlich offers also tutorials, free articles and videos. I like his videos a bit less than Mitchs, but the written tutorials are quite good, too.
There are many others there, so choose any and just start…
The app function
The App has four code files:
- MainActiviy.kt: Contains the single activity of the app. This activity offers interfacing to all UI elements and makes the whole “wiring” to the other classes of the App.
- BluetoothConnectionService.kt: Contains the class in charge of doing all the Bluetooth work. Bluetooth communication should be handled in threads separate from the main thread, this service has one thread in charge of connecting to the Bluetooth device and another in charge of handling the communication.
- RecyclerViewAdapter.kt: This class is needed to handle lists in Android. We show the Bluetooth devices as a list and this class just populates that list.
- PhoneData.kt: This is a Singleton (a static class which is not instantiated, and is available globally). Singletons are not the preferred pattern for android development, but is a simple way to get things working, and for simple apps like this, are just “good enough”. Anyways, this singleton stores the data we want to show in the OLED display via bluetooth, like temperature, time and signal strength.
In few words, MainActivity starts the Bluetooth service, this starts the thread to discover Bluetooth devices. Once they are discovered, the recycleradapter shows them on screen. When the user selects a device, the service switches to the connection thread, to connect to that device. The PhoneData singleton, also started by MainActiviy, has all data ready for the service to transmit it to the BT device.

Hinterlasse einen Kommentar