Schlagwort: electronic for kids
-

Simple Timer with LEDs and speaker
inspired by the Arduino Starter Kit example #8: ‚The Digital Hourglass‘, my daughter and I made a simple tea timer using two push buttons to enter two different desired times: 3 minutes and 5 minutes. After pressing any of the push buttons all 6 LEDs will light up. Each one of the 6 LEDs will…
-

Boldport Kits – The Tap and the Cordwood Puzzle Too
Boldport sells many interesting soldering kits, inspired by old famous circuits. We got two of them: We are using „The Tap“ (a touch sensor circuit) to turn on three of the eight LEDs from the „Cordwood Puzzle Too„. The Tap – a touch sensor circuit from 1974 with three touch pads, a reset touch pad…
-
Projekt 02 Spaceship Interface
Kursanleitung für das Arduino Starter Kit. Stecke deine LEDs: Du kannst andere Farben für die LEDs benutzen, z.B.: Stecke die Widerstände zum Minuspol der LEDs. Die 220 Ohms Widerstände können so aussehen: ERINNERUNG: Stecke den Taster: Stecke einen 10 kOhm Widerstand zu dem Taster: Stecke die Kabel zum Arduino: Jetzt kannst du das Programm hochladen…
-
Geschützt: Projekt 08 Digital Hourglass
Es gibt keine Kurzfassung, da dies ein geschützter Beitrag ist.
-
Geschützt: Projekt 07 Keyboard
Es gibt keine Kurzfassung, da dies ein geschützter Beitrag ist.
-
Arduino Starter Kit Code
Offizielle Anleitung HIER Du kannst alle Programme auf deinem Arduino IDE hier finden: Datei -> Beispiele -> 10.StarterKit_BasicKit -> … WICHTIG: Vergiss nicht vor dem Hochladen dein Board und dein COM Port korrekt auszuwählen: Werkzeuge → Board→ … Werkzeuge → Port→ … Mehr Info here Falls du den Seriellen Monitor brauchst, klick oben rechts: Schau…
-
Projekt 06 Light Theremin
Kursanleitung für das Arduino Starter Kit. Stecke deinen Summer oder Piezo: Stecke den Fototransistor: und verbinde das längere Bein zu +: Verbinde das kürzere Bein mit einem 10 kOhm Widerstand zum Minuspol (–) : Stecke die Kabel zum Arduino: Jetzt kannst du das Programm hochladen und deinem Arduinobuch folgen. Du kannst die Frequenzen im Code…
-
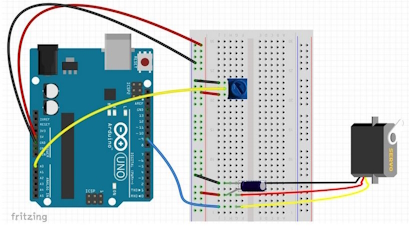
Projekt 05 Mood Cue
Kursanleitung für das Arduino Starter Kit. Stecke dein Potentiometer: Mittleres Bein des Potentiometers zum Analog-Eingang A0 Stecke den Servomotor. Achte auf die Reihenfolge der Pins: rot zum Pluspol, schwarz zum Minuspol. Stecke die Kabel zum Arduino: Stecke den 10µF(decoupling) Kondensator. ACHTE darauf, wo du den Minuspol und den Pluspol steckst, sonst kann der Kondensator explodieren…
-
Geschützt: Projekt 03 Love-O-meter
Es gibt keine Kurzfassung, da dies ein geschützter Beitrag ist.
-
Magic 8 Ball – Arduino Kit Example
The Arduino Starter Kit comes with many examples for beginners. The Crystal Ball example is based on the famous mechanical toy called the Magic 8 Ball. The associated code is included on the Arduino IDE. To open the code on the Arduino IDE, go to: File→ Examples→ 10.StarterKit_BasicKit → … and choose the example you…
-
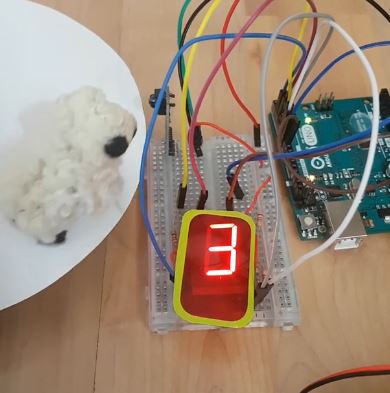
Schafzähler mit Infrarot-Sensor und 7-Segmente-Display
Jedes mal, wenn sich etwas dem Infrarot-Sensor nähert, wird die im 7-Segmente-Display angezeigte Zahl um eins größer. Materialien: Videos: Hardware: Achte auf das Datenblatt, jede Anzeige (Display) hat eine eigene Pinbelegung. Wir benutzen folgendes zweistellige 7-Segment-Display mit gemeinsamer Anode (3261B): Display-Segmente A … G (LEDs) für jede Ziffernstelle (Dig.1 und Dig.2): Jedes Segment (A ……
-

Wearable with Gemma M0 and Accelerometer
Using the microcontroller board Gemma M0 from Adafruit my daughter and I are simulating gravity on the LEDs of the NeoPixel Ring using an accelerometer LIS3DH. The LEDs will light on, following the inclination of the board: If you hold the board completely vertical and you rotate it, the LEDs will light on individually, changing…
-
LED
English Eine LED (auf Englisch: Light Emitting Diode) ist wie eine kleine Lampe, die zwei Beinchen hat: eine Anode (+) und eine Kathode (–). Wenn du die Beine korrekt mit einer Batterie verbindest, leuchtet die LED. Die LED lässt den Strom nur in eine Richtung fließen. WICHTIG: Es ist jedoch ratsam, immer einen Widerstand davor…
