Arduino ist der Name einer einfachen (easy-to-use) Hardware und Software, um interaktive Projekte zu verwirklichen. Um mehr darüber zu erfahren, kannst du die Arduino-Website besuchen:
Es gibt viele verschiedene Arduino-Boards, hier sind einige Beispiele:

https://www.arduino.cc/en/Main/Products
wir arbeiten in den Kurs mit dem Arduino UNO.
Arduino UNO-Board. Hardware
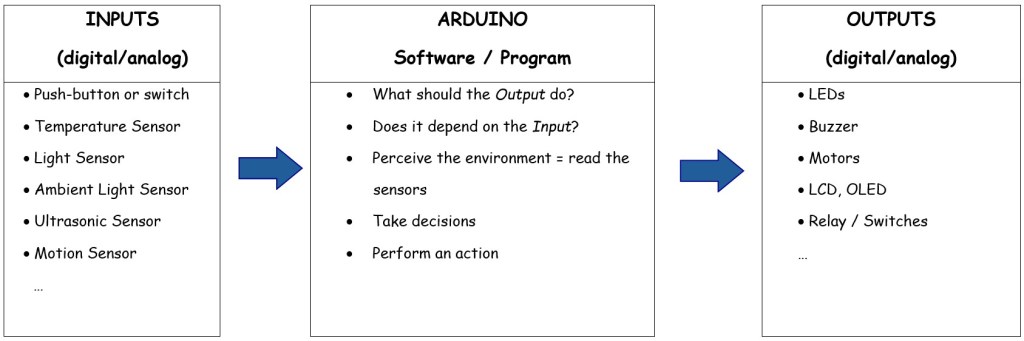
Das Arduino-Board beinhaltet einen Mikrocontroller und viele andere elektronische Bauteile, digitale und analoge Ein- und Ausgänge, einen USB-Konnektor zum Computer, eine externe Stromversorgung (z.B für eine Batterie), etc.
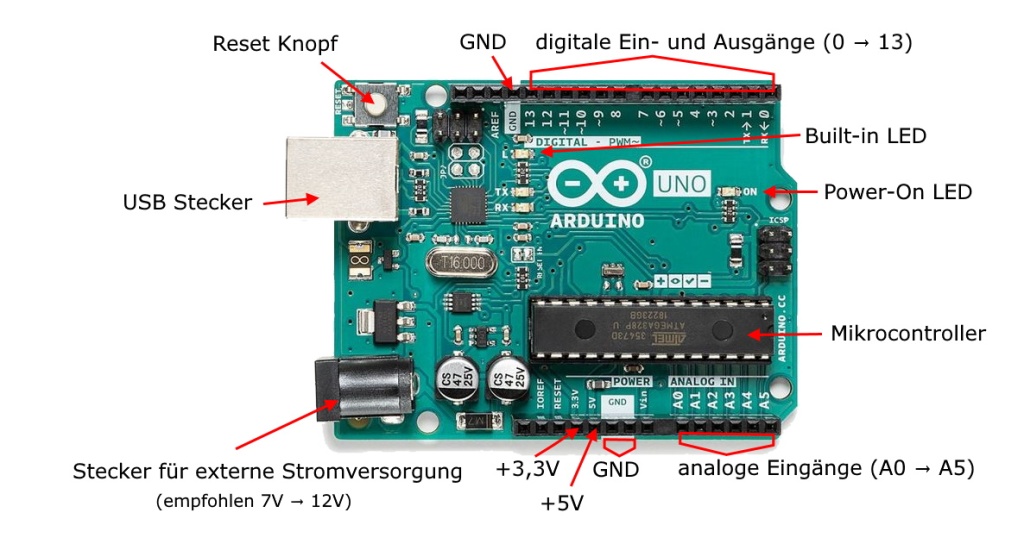
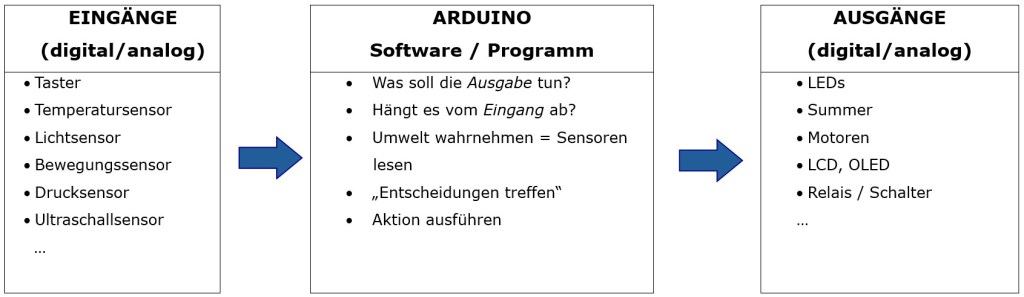
Wenn du Sensoren an die Eingänge anschließt, kann der Arduino seine Umwelt wahrnehmen und dein Programm ausführen, z.B. folgende Signale an die Ausgänge senden: LEDs zum Leuchten bringen, Motoren antreiben, Summer aktivieren und vieles mehr …
Treiber für Arduino-Klone
Es gibt viele Arduino-Klone, die billiger sind aber gut funktionieren. Man muss nur vorher einen CH340 (oder CH341) Treiber installieren. z.B. hier kann man den Treiber herunterladen: (installieren bevor du deinen Arduino-Klon mit dem PC verbindest)
https://funduinoshop.com/wie-installiert-man-einen-ch340/ch341-treiber
Arduino programmieren – Software
Arduino IDE (auf Englisch: Integrated Development Environment)
Du kannst im Arduino IDE dein Programm schreiben, um dem Arduino zu sagen, was er machen soll, wenn etwas am Eingang passiert oder z.B. eine Ausgabe fortlaufend wiederholen lassen. In dieser Arduino IDE musst du aber das Programm in einer C-ähnlichen Programmiersprache (Processing) schreiben.
Arduino IDE ist eine open-source Software und kann auf:
https://www.arduino.cc/en/Main/Software
heruntergeladen werden.
Wie kann ich Beispiele-Code auf der Arduino IDE hochladen? hier
Beispiel:
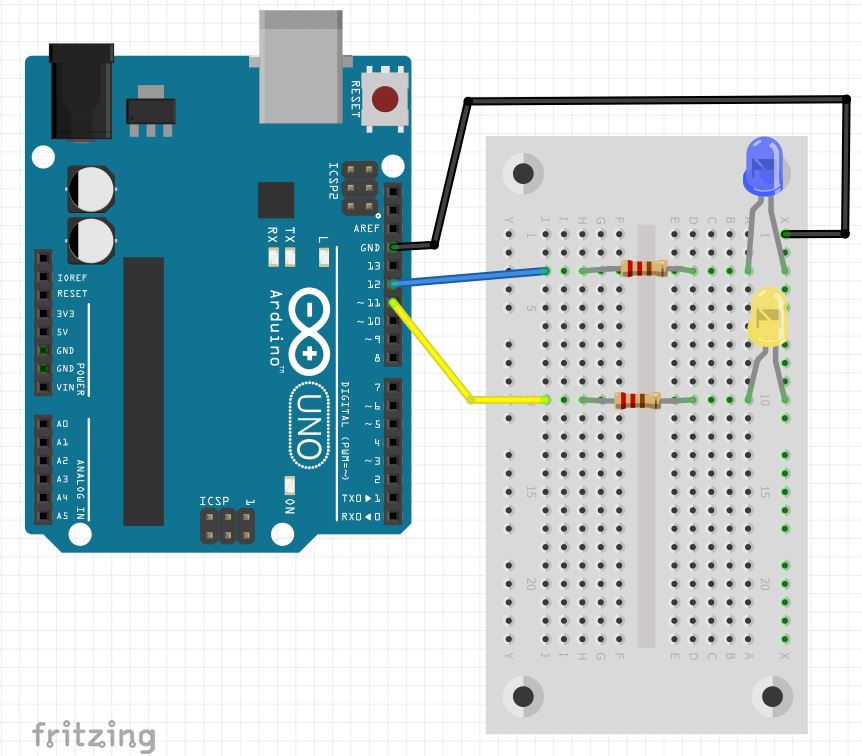
Stecke zuerst eine LED und einen Widerstand auf deine Steckplatine:
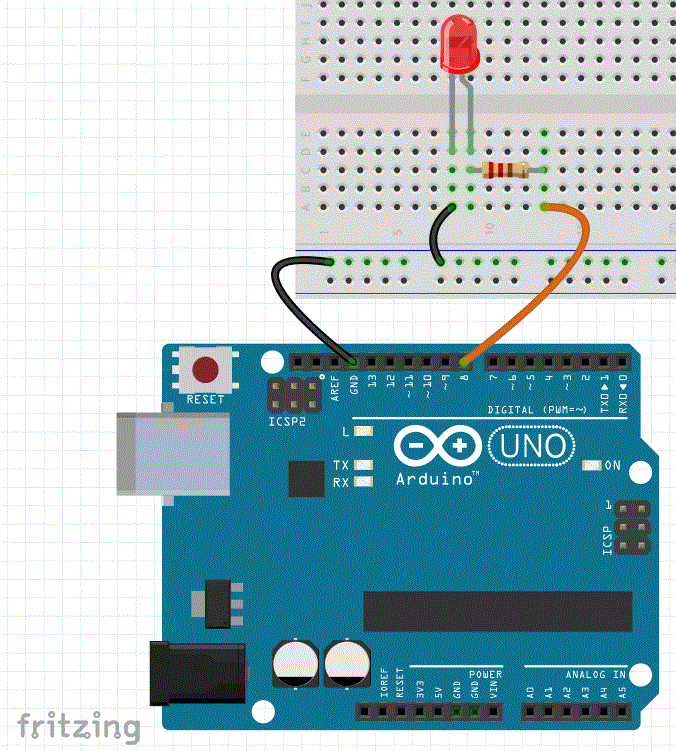
Wähle einen digitale Ausgang von Arduino, z.B.: Pin 8 für die LED-Anode (+ Pluspol) bzw. für den Widerstand. Verbinde die LED-Kathode (– Minuspol) mit einem Kabel (schwarze Kabel im Bild) zum GND im Arduino Board.
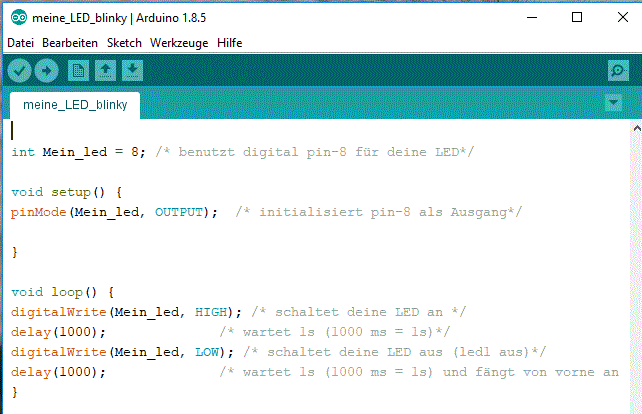
Wenn du das folgende Programm auf das Arduino-Board überträgst, dann wird dein LED auf Pin 8 so blinken:
1 Sekunde an, 1 Sekunde aus, 1 Sekunde an, … usw. …
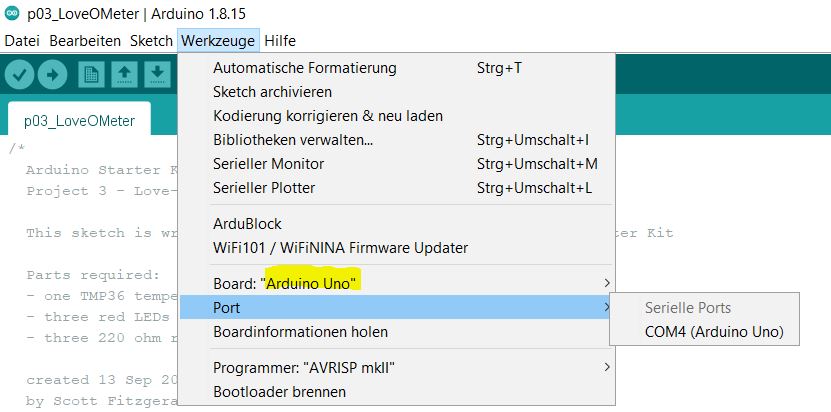
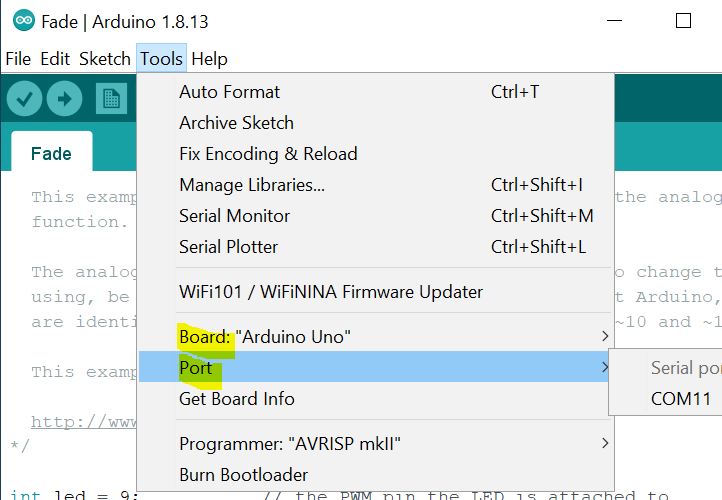
WICHTIG: Vergiss nicht vor dem Hochladen dein Board und dein COM Port korrekt auszuwählen:
Werkzeuge → Board→ …
Werkzeuge → Port→ …
ARDUBLOCK
ArduBlock ist ein Tool (Hilfswerkzeug), um den Arduino einfacher zu programmieren, und zwar mit Hilfe einer so genannten graphischen Programmierung.
Hier kannst du vorgefertigte Blöcke aus dem linken Fenster mit der Maus herausziehen und auf der rechten Seite anordnen – wie ein Puzzle.
ACHTUNG: wenn du ArduBlock benutzen möchtest, musst du eine 1.x Version von Arduino IDE installieren. Ab Version 2.x werden keine zusätzlichen Tools (wie ArduBlock) mehr unterstützt. Mehr Info:
https://forum.arduino.cc/t/arduino-2-0-beta-no-ardublock/856338
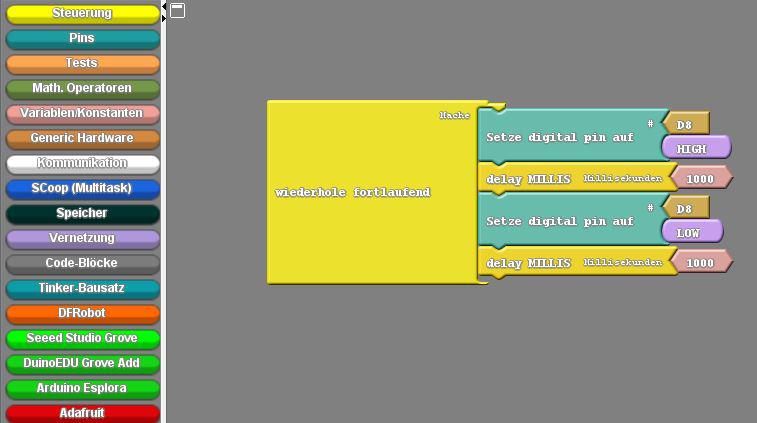
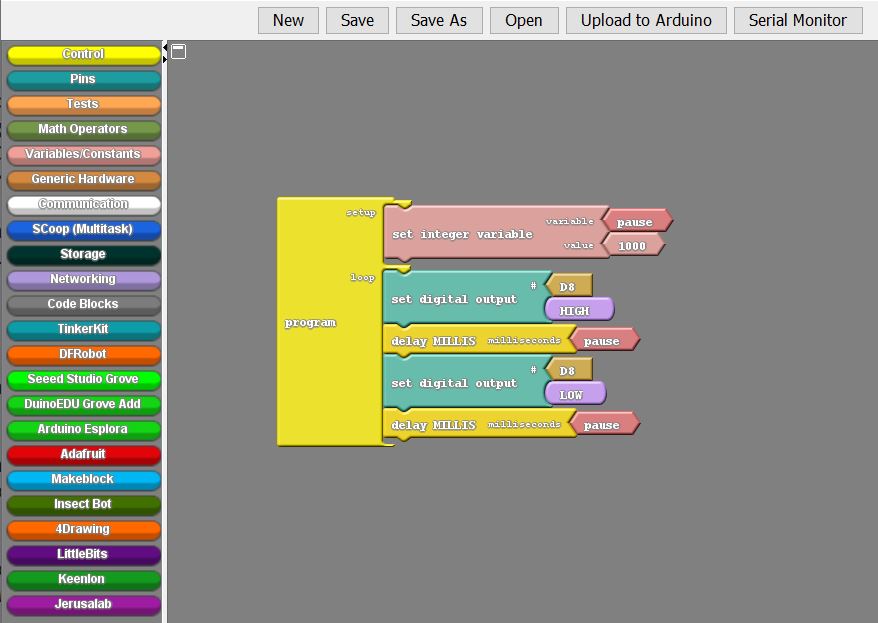
Beispiel: mit dem folgenden Programm kannst du eine LED, die auf dem digitalen Pin D8 verbunden ist, 1 Sekunde leuchten lassen, 1 Sekunde ausschalten, 1 Sekunde einschalten, 1 Sekunde ausschalten, … usw. …
Du kannst das ArduBlock hier kostenlos herunterladen:
https://github.com/taweili/ardublock/releases
Dort die neueste .jar Datei herunterladen, z.B.:
ardublock-all-master-beta-20171028.jar
Kopiere die .jar Datei auf folgenden Ordnerpfad in deinem Arduino-Ordner:
C:\Program Files (x86)\Arduino\tools\ArduBlockTool\tool\ardublock-all-master-beta-20171028.jar
Um das ArduBlock zu benutzen, öffne eine neue Datei auf dem Arduino IDE und dann gehe auf Werkzeuge -> ArduBlock

SCRATCH FÜR ARDUINO
Du kannst verschiedene Arduino Boards mit Scratch programmieren. Du kannst Scratch fpr Arduino (S4A) hier kostenlos herunterladen:
Folge genau der Anleitung. Vergiss nicht, dass du die Firmware auf den Arduino hochladen musst, bevor du startest.
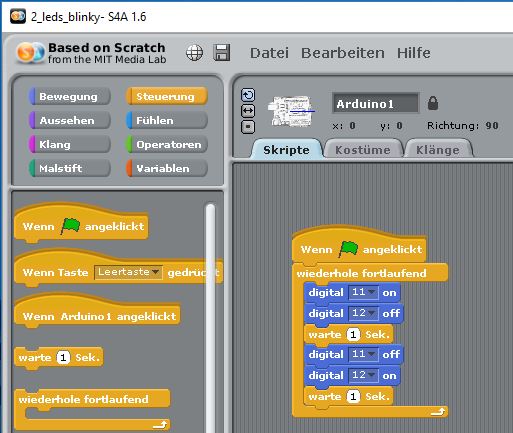
Beispiel:
What is Arduino?
Arduino is the name of an easy-to-use hardware and software for implementing interactive projects. To learn more about it, you can visit the Arduino website:
There are many different Arduino boards, here are some examples:
https://www.arduino.cc/en/Main/Products
We use the Arduino UNO in the workshops.
Arduino UNO board. Hardware
The Arduino board has a microcontroller and many other electronic components. It has digital/analog inputs and outputs, an USB connector to communicate with your computer, a connector for an external power supply (e.g. for a 9V battery), …
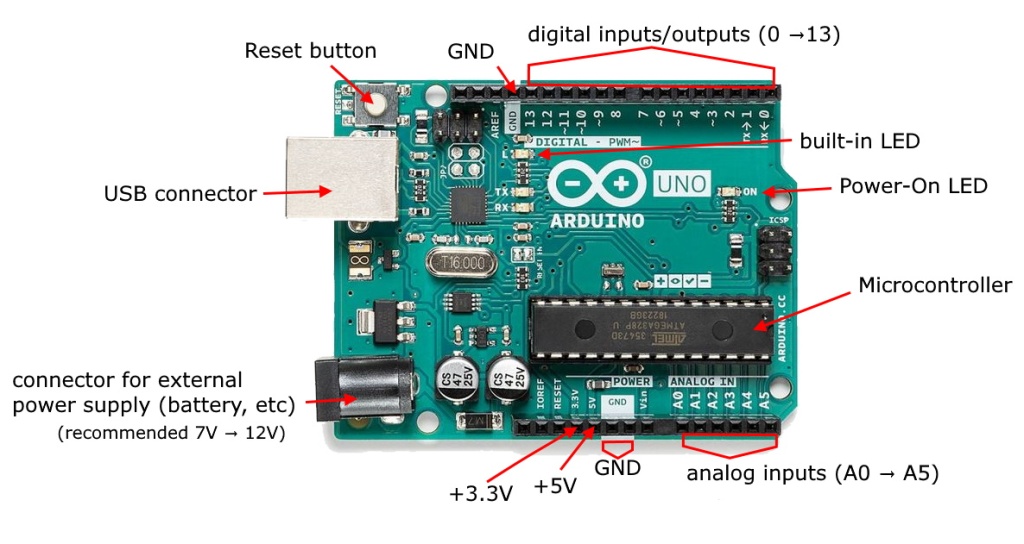
If you connect sensors to the inputs, the Arduino can perceive its environment and execute your program, e.g. send the following signals to the outputs: light up LEDs, drive motors, activate buzzers and much more …
Arduino IDE (short for Integrated Development Environment)
You can write your program in the Arduino IDE to tell the Arduino what to do if something happens at the input or just to repeat a task continuously. In this Arduino IDE you have to write the program in a C-like programming language (Processing).
The Arduino IDE is an open-source software and can be downloaded from:
https://www.arduino.cc/en/Main/Software
How can I upload the code on the Arduino board? here
There are many Arduino clones that are cheaper but work well. You just need to install a CH340 (or CH341) driver beforehand. For example, you can download the driver here: (Install it before you connect your Arduino-clone to the PC)
How to install the CH340 Driver
Example:
First connect an LED and a resistor on your breadboard as shown in the picture below:
Choose a digital output from Arduino, for example: use pin 8 for the LED anode (+ positive pin). Always use a resitor for the LED!. Connect the LED cathode (negative pin) with a wire (black wire on the picture) to the GND in the Arduino board.
If you upload the following program to the Arduino board, your LED on pin 8 will blink like this:
1 second on, 1 second off, 1 second on, … etc. …

IMPORTANT: do not forget to set your Board Type and your COM Port correctly before uploading your programm:
Tools → Board → …
Tools → Port → …
ARDUBLOCK
ArduBlock is an auxiliary tool to program the Arduino easily, with the help of a so-called graphic programming.
Here you can pull predesigned blocks out of the left window menu with the mouse and connect them together on the right window – like a puzzle.
For example, with the following program you can let the LED that is connected to digital pin D8 light up for 1 second, switch it off for 1 second, switch it on for 1 second, switch it off for 1 second, … etc.
You can download the ArduBlock for free here:
https://github.com/taweili/ardublock/releases
Download the latest .jar file there, e.g.:
ardublock-all-master-beta-20171028.jar
Copy the .jar file to the following folder path in your Arduino folder:
… \ Arduino \ tools \ ArduBlockTool \ tool \ ardublock-all-master-beta-20171028.jar
SCRATCH FOR ARDUINO
You can program different Arduino boards with Scratch. You can download Scratch for Arduino (S4A) for free here:
Follow the instructions exactly. Don’t forget that you need to upload the firmware to the Arduino before starting.
Example:

Hinterlasse einen Kommentar